masciiさんの以下のページを参考にカスタマイズしてみる
https://qiita.com/mascii/items/4c366ad4709469d5fda9
やってみる事
- ボタンを押すと温度センサの値をLINE Notifyで通知する
- 送信中にLEDを光らせる
ハードウエア構成
- Seeed StudioのGrove Starter kit for Arduinoを使って半田付けなしで構成する
-
使用するモジュール
- Base Shield (VCC SWは3.3Vに設定)
- Grove_Temperature Sensor (A0に接続)
- Grove_Button (D8に接続)
- Grove_LED (D4に接続)

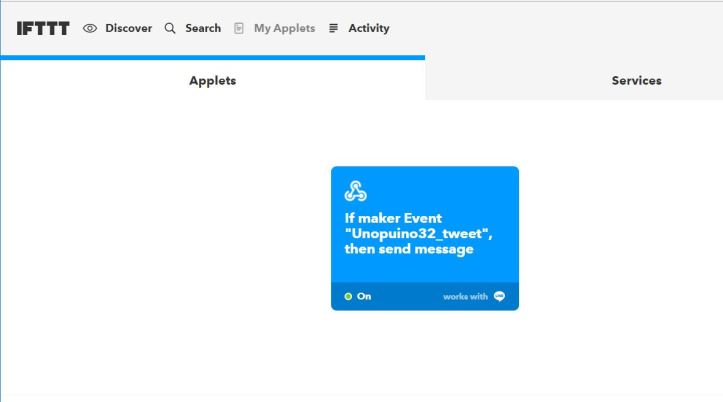
IFTTTでアプレットを新規作成
検索で”webhook”をさがして”Connect”


New Appletの”+this”でwebhookを選択


任意の”Event”を設定

”+that”で”LINE”を選択し”connect”


“LINE”のActionで”Send message”を選択し、Recipientを”1:1でLINE Notifyから通知を受け取る”Messageに
“{{EventName}}<br>
{{OccurredAt}}<br>
{{Value1}}<br>
{{Value2}}<br>
{{Value3}}”
と設定し”Create Action”で作成


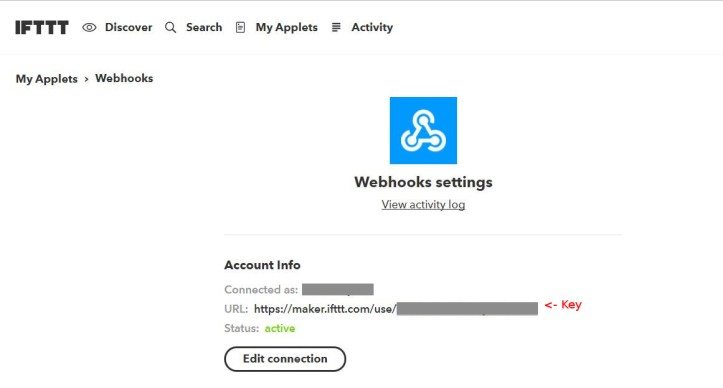
“Webhook”の設定よりKeyを確認しておく

スケッチの修正
- ここからサンプルスケッチをダウンロード
- “config.h”にWifiのSSID, Password及びWebhookのEvent, Keyを書き込む
const char* ssid = "xxxxxx";
const char* password = "xxxxxx";

String makerEvent = "xxxxxxxx"; // Maker Webhooks
String makerKey = "xxxxxxxxx"; // Maker Webhooks
- “ESP32_WiFiClient-IFTTT2line.ino”のsend()関数の引数に文字列を渡すと、LINE messageのValue1~3に値を入れて送信出来る。
void send(String value1, String value2, String value3) {

 ~中略~

}
- 温度はAD(12bit)のRead値を元に以下の関数で計算して取得している
String readTemp()
{
 float temperature;
 int B=3975; // B value of the thermistor
 float resistance;
 int val = analogRead(pinTemp); // get analog value

 resistance=(float)(4095-val)*10000/val; // get resistance (12bit AD)
 temperature=1/(log(resistance/10000)/B+1/298.15)-273.15; // calc temperature

return "Temperature:" + String(temperature) + "+deg";
}
以下はサンプルプログラムでボタンを押して温度を送信した時のLINE Notifyでの受信例


[…] ESP32 Wifi経由でIFTTTを使ってみる […]
いいねいいね
[…] こちらのサイトを参考にしました。 […]
いいねいいね
[…] ※こちらのサイトを参考にしています。 […]
いいねいいね
[…] こちらのサイトを参考にしました。 […]
いいねいいね